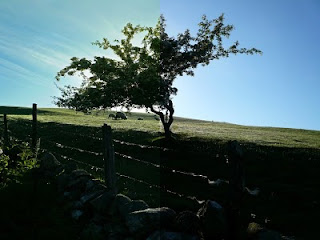
You can see lots of light from behind the tree but the tree itself and other details are too dark - ie sheep and wall. Now, if you wanted silhouettes you could increase the contrast and be done with it but I'm going to attempt to show you how I bring these shadows up a little.
On the next screenshot I am changing the colour scale in Colour Balance - you can use Auto Colour but this doesn't always give the result you are looking for.. Remember this is NOT the same for every photo and you have to use your eye to gauge when it is at its best.

Shadow/Highlight is next - again this can be easily overdone so be careful.. my settings below should be ok for most processing however, watch out for added gainyness or halos.. Halos form between highlight and shadow - if it is pushed too much a white glow will occur around a dark object which looks surreal and unpleasant.

So without pushing the shot too much I still need more exposure on the dark objects - even after the above trick. Below I am going to create a new layer. Layers are found in the windows list but are usually out already on the right hand side of the screen. Right click and duplicate layer. You will be asked what to call the layer - I have left it as is.. "Background Copy"
 Once you chave named your new layer it will appear in the layers box above the 'original image'. Make sure the top (copy) layer is selected.
 Next I went to Exposure and made the exposure +1.00... Click on ok and you see a big change straight away - however the lighter areas will lose their colour somewhat.
 Getting the colour back could not be easier.. Select the Eraser tool and set it up as you see below.. Opacity about 28% and Flow about 31%... You can now erase the areas you lost the colour on.. and the layer underneath (original) will come through.. I erased the sky and the grass areas.
 Afterwards right click on the layer and Flatten Image.
The only thing missing next was a little colour in the tree.. again a little trick for getting this back is a follows: Make a new layer with nothing on it - select this layer.. and then select the gradient tool. I selected the already made grey to clear brush and changed the grey to yellow.. I then dragged the mouse from the top middle of the image to the bottom middle..
If you have done this correctly the gradient will be on the top layer (new layer) and the original image underneath still intact. Looking like below...
 As you can see that look is unatural - but if you go to layers again and change the style from Normal to Soft Light, it will only appear on the dark area.. (the tree)
 Finally I'm happy with the shot - sometimes at this point you can add some sharpening but I don't feel it's necessary here. Below is a split with the Edited version on the left and the original on the right:

Thanks for this, Ray!! I want more!!! ;)
ReplyDeleteThanks for the tutorial Ray!
ReplyDeletethanks a lot Ray !
ReplyDeleteIf you fancy writing more, I am here to learn :)
thanks guys - this takes a bit of time to do but i will be preparing some other tutorials so 'follow me' if you want to keep updated - thanks :)
ReplyDelete